Monday, March 28, 2011

Spring Blog Candy

Look what I found this morning, Blog Candy over at Sharon and Smokey's.


Look at what you get:
3D Easter Embellishments

18 pc Spring color Flower Buttons
100 Adhesive Rhinestone (2 shades of Green, Yellow, Blue, then Red, Pink, Purple)
2 sets of Studio G clear stamps
3 Glittery flourishes
2 Bottles of glitter glue (Light green and Mauve)
6 Flower dots
5 strands of spring ribbon (3 feet each total of 15 ft) All spring colors.
6 skeins of Floss for sewing on your cards or layouts. (All spring Colors)
Baggie of spring silk flowers
Fiskars Threading Water boarder punch( New in package Scallop boarder with holes)


This blog candy should help you make some beautiful spring cards and layouts. If you would like a chance to win this "Spring Blog Candy"  click Here for details.

Saturday, March 26, 2011

Creative-Sketches Challenge-CS25H

This week on Creative-Sketches we have a Sketch and Holidays or Celebrations challenge. Create your project using our Sketch with some kind of Holiday or Celebration as the subject. If you would like to join in on the fun here is there link: http://www.creative-sketches.com/


Here is my version: For Plant a Flower Day
I really love this time of year so my card is an explosion of Spring Colors. 


Supplies for this card:
Card Stock:                     Perfect Plum, Blushing Bride, and Old Olive
Ink Pads:                         Perfect Plum, Versa Mark
Stamps:                           Bliss from Sale-s-Bration Mini
Punches:                          2 3/8 Scallop Circle
Textured Impressions:    Square Lattice
Embosslits:                     Beautiful Wings
Ribbon:                           Chanilly and Pretty in Pink
Basic Pearls, Vintage Springtime Dsp from Occ Mini
Glue Dots, Sticky Red Tape, Snail

I hope everyone enjoys my  card today and I hope to have more soon in my Springtime series. 

Monday, March 21, 2011

The Fancy Fold Tutorial as I Promised

Here is the tutorial I promised of the card I made for SU-Stars Blog Hop. This was my first attempt at a Fancy Fold card and it was fast easy and fun.

SPECIAL NOTE!

This is NOT my original design for the fold on the card I CASED it from Patrice Herrera at http://mylittlepatchofdirt.blogspot.com. I also believe you can find the original on Splitcoaststampers or in Fancy Fold CD over at Technique Junkies. I did design and decorate this finished card. I adjusted some of the measurements to fit my theme.

It is only right to give credit where credit is due.

Here is the Outside
 Here is the Inside

Now onto my tutorial:

Supplies Needed:

1 piece of Old Olive Card Stock - 8 1/2 x 5 1/2
2 pieces of card stock 1 in Perfect Plum and 1 in Springtime Vintage Designer Series Paper (DSP) -5 1/4 x 1 7/8
2 pieces of card stock 1 in Perfect Plum and 1 in Springtime Vintage DSP - 5 x 1 5/8
1 piece of card stock of Perfect Plum 5 x 4
1 piece of Springtime Vintage DSP 4 7/8 x 3 ¾
1 piece of Whisper White Card Stock - 2 7/8 x 5/8
1 piece of Old Olive Card Stock - 3 7/8 x 6/8
1 piece of Springtime Vintage DSP - 4 x 5/8
1 piece of Perfect Plum card stock 4 1/2 x 1 7/8
1 piece of Perfect Plum card stock 4 ½ x 3 ½ (for photo)
1 piece of scrap Old Olive to make the leaves
SU Elements of Style Stamp Set
SU stamp pads; Old Olive, Perfect Plum
1 Medium Rosette
VersaMark
Glue Dots, Red sticky tape
1 Perfect Plum Marker (I used to color the Rosette)
1 small Basic Pearl
Clear Embossing Powder
Bone Folder


Instructions: For inside Panel

Cut a 8.5 x 11 piece of card stock in half 4 1/4 x 5 1/2

Score at 2 1/8 and 4 1/4 use the bone folder to smooth edges.

 
Prepare cut card stock and DSP by sponging the edges and the layers  for the outside and inside folds.

Cut  2 pieces of card stock 1 in Perfect Plum and 1 in Springtime Vintage Designer Series Paper (DSP) 5 1/4 x 1 7/8

2 pieces of card stock 1 in Perfect Plum and 1 in Springtime Vintage DSP - 5 x  1 5/8


Use VersaMark and Perfect Plum to stamp the inside of the  Perfect Plum panel with the Rose stamp from the Elements of Style Stamp Set and then use clear embossing powder and heat with heat gun and then set aside before attaching it to the DSP. 


Cut  1 piece of card stock of Perfect Plum 5 x 4 and 1 piece of Springtime Vintage DSP 4 7/8 x 3 ¾


Attach the inside large Perfect Plum piece of card stock to the Springtime vintage DSP piece then attach to the center panel.

 Cut 1 piece of Perfect Plum card stock 4 ½ x 3 ½ (for photo). Attach that to the DSP.


Now for the Outside Panel:

1 piece of Whisper White Card Stock - 2 7/8 x 5/8

1 piece of Old Olive Card Stock - 3 7/8 x 6/8
1 piece of Springtime Vintage DSP - 4 x 5/8
1 piece of Perfect Plum card stock 4 1/2 x 1 7/8


Stamp the sentiment on the Whisper White piece of card stock and cut it into an arrow. (Remember to sponge ink on all of the pieces of card stock for the front panel. Cut the Old Olive piece into an arrow shape as well. Assemble so that all pieces go on top of the Perfect Plum/DSP piece, smallest to largest.

I punched out little leaves of Old Olive with my Big Shot and the Little Leaves die. Then I dyed one of the medium Rossettes from the Occ Mini with my Perfect Plum Marker. Then attached Rosette and leaves to Whisper White sentiment piece with a two glue dots.

I then attached assembled panel to the front panel. I used  red sticky tape strips to secure the right half of the panel. Place this piece about half way down the outside panel or where ever you would like the sentiment to be. I found using sticky tape held better than glue dots.

That should do it. The fun thing about making this style of  card is that you can use it for almost any occasion. I know I will be making more of them for my friends and family.

Sunday, March 20, 2011

Stampin Diva's Color Challenge 02


Welcome everyone to our monthly color challenge!!! This month I have selected soft colors that will be perfect for your Spring creations: Marina Mist, Crumb Cake or River Rock, Always Artichoke and Baja Breeze.


AND, to get your creative juices really going, we are adding a second challenge this month! Make a completely new and original (oh, okay, you can CASE, lol, but original to you) a 3-D project -- a basket, a box, jewelry -- whatever you want to make. You can also combine this challenge with the monthly Color Challenge!

AND to make it really interesting, the Design Team Members will pick their favorite project and one lucky person will be chosen as the winner for this challenge and receive a gift from the new Summer Mini! YUMMY!!!!


Come along and join me and the Diva Design Team, we are all about having fun!!

Here is my card I posted as part of the Design team.


I combined our color challenge with Stamping 411: Saturday sketch challenge  #195. I love the simplity of the design.

Supplies:
Card Stock:             Marina Mist, Crumb  Cake, Always Artichoke, Baja Breeze and Very vanilla
Stamp Pads:            Always Artichoke, Crumb Cake, Baja Breeze
Stampin Markers:   Always Artichoke, Real Red
Stamp Sets:             Element of Style, and Elegant Thank You
Punches:                  23/8 Scallop Circle
DSP:                       Springtime Vintage
Ribbon:                   White Satin(dyed with Baja Breeze), Always Artichoke Seam Binding
Embossing folders:  Square Lattice and Perfect Polka Dots

I know it looks like it took along time, but it really didn't. I cut the cardstock to the dimmensions stamping 411 gave, ran them thru the embossing folders, stamped images, use the markers to color the roses, make the flower using the scallop punch and dye the ribbon, and assemble. I think the hardiest part was picking the right colors for the right shape. My element of style didn't quite come out the way I wanted it. I wanted a more vintage look. Let me know what you think!! 


Saturday, March 19, 2011

Welcome to SU Stars March Blog Hop

I am so excited that Sunday if officially spring.  It is that time again for SU Stars monthly Blog Hop that is happening this weekend March 19/20. The start time is Saturday morning at 7am PT/8am MT/9am CT/10am ET and the posts will be up thur Sunday night at Midnight.

If you started at the beginning then you arrived here from the very talented  Jane Hignite, at her blog http://stampwithjane.com/ then you are right  on track. If you get lost along the way then go back to the beginning at http://su-stars.blogspot.com/  where you will find the list of blogs.

This month we are focusing on items from the Occasions Mini or make something welcoming in Spring. I chose to make my card from the Occasions Mini and make it Springtime as well.

It is so easy with all the new Designer Papers,Ribbons, and Buttons!  My card is also being entered in the weekly challenge at Creative Sketches CS24T Technique-Fancy Fold, Cuts, or Punches. I chose to do a Fancy Fold card for both.   This is NOT my original design for the fold on the card I CASED it from Patrice Herrera at http://mylittlepatchofdirt.blogspot.com/. I also believe you can find the original on Splitcoaststampers or in Fancy Fold CD over at Technique Junkies. I did design and decorate this finished card. I adjusted some of the measurements to fit my theme. It is only right to give credit where credit is due.

Here is the outside of my card:

Here is the inside of my card: This is a photo of my brother and his wife, I thought it went perfect in the empty space and sentiment from Elegant Style stamp set.


Supplies Needed:

1 piece of Old Olive Card Stock - 8 1/2 x 5 1/2
2 pieces of card stock 1 in Perfect Plum and 1 in Springtime Vintage Designer Series Paper (DSP) -5 1/4 x 1 7/8
2 pieces of card stock 1 in Perfect Plum and 1 in Springtime Vintage DSP - 5 x 1 5/8
1 piece of card stock of Perfect Plum 5 x 4
1 piece of Springtime Vintage DSP 4 7/8 x 3 ¾
1 piece of Whisper White Card Stock - 2 7/8 x 5/8
1 piece of Old Olive Card Stock - 3 7/8 x 6/8
1 piece of Springtime Vintage DSP - 4 x 5/8
1 piece of Perfect Plum card stock 4 1/2 x 1 7/8
1 piece of Perfect Plum card stock 4 ½ x 3 ½ (for photo)
1 piece of scrap Old Olive to make the leaves
SU Elements of Style Stamp Set
SU stamp pads; Old Olive, Perfect Plum
1 Medium Rosette
VersaMark
Glue Dots, sticky tape
1 Perfect Plum Marker (I used to color the Rosette)
1 small Basic Pearl
Clear Embossing powder
Bone Folder

That should do it. I am posting on Monday the step by step picture tutorial on how I made my card for anyone who would like it.  Now on to Mary Campbell over at http://mimitojett.blogspot.com.  I just know she has something wonderful to show you.

Thursday, March 17, 2011

Creative-Sketches CS24T TECHNIQUE Challenge

This is a TECHNIQUE week, and our Technique is FANCY FOLDS, Cuts and Punches. 


That sort of leaves it open for interpretation!
 If you want to play along go to http://www.creative-sketches.com/2011/03/17/creative-sketches-cs24t-technique-challenge/.

Tuesday, March 15, 2011

Creative Sketches Color Challenge CS23C

I just love this week's colors so I went a little Vintage.


Supplies:
Card Stock:   Old Olive, Baja Breeze, Bashful Blue
Stamp Pad:    Basic Grey, Versa Mark
Embossing Folder:   Framed Tulips
Ribbon:         Victorian lace
Stamp Sets:    Sale-a-bration Bliss
Basic Pearls, Baja Breeze Vintage flowers and Clear embossing powder

I decided to use Old Olive as my base card and using the new Framed Tulips embossing folder from Stampin Up Occasions Mini. Layered Baja Breeze and Bashful Blue in the center. I stamped the Motif image with Basic Grey and embossed it with clear embossing powder. I ran lace down the side with pearls ending with Vintage Baja Breeze flower. Added more pearls and embossed Butterfly with more Pearls. I had a lot fun and hope you enjoy.

Friday, March 4, 2011

I just love Blog Candy

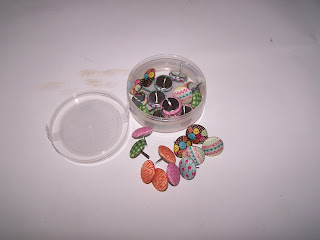
Here are some Fabric Buttons I won from Lonnie Holt with SU Stars.

Wonder what I will come up with!!!!!
Related Posts Plugin for WordPress, Blogger...