I had a few request to how I did my version of Neutral Shadow that I posted for the SU Tour. Well I did it using my favorite stamp set Elements of Style. It looks longer than it is to do the technique, I know this is suppose to be clean and simple, but I have a hard time not adding lace, pearls, ribbons to my cards. I just love the Vintage look.
Supplies:
Cardstock: Crumbcake, Soft Seude
Ink pads: Soft Seude, Versa Mark, Craft Whisper White
Markers; Cherry Cobbler, Soft Seude, Crumb Cake
Embossing Folder Framed Tulips, Rosettes from Occasions Mini
Clear Embossing Powder
Victoria Lace and Basics Pearls
Beautiful WIngs Embosslits Die
Let's get started: I stamped first with Versa Mark, then I restamped with Craft Whisper White
Then stamped on crumb cake card stock.
Then gathered up my embossing tray, heat gun and clear embossing powder and embossed the image.
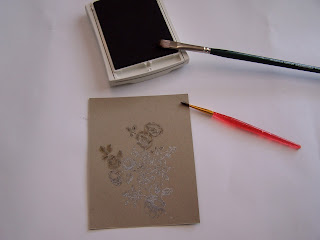
Then I took Soft Suede Ink pad and it should have been a stencil brush but I didn't have one and used
some of my paint brushes. The softer one worked better for me. What you next is tap the ink and stipple or add ink to the outline of the stamp you used(almost like stenciling). Becareful because too fast and cause the shadowing to go outside the lines and smudge.
When you are finished it should look something like this.
I then ran Soft Seude card stock thru the Framed Tulip embossing folder
Then I gathered up what I was going to use to complete my card. You will see I already used the embosslits and made my butterflies, cut my strip of lace.
I took 3 rosettes and clored them to match the colors in my card. Here I show how I colored one using Cherry Cobbler, and then a picture of them finished.
Then I added small basic pearls to the centers of the rosettes.
Then I ran a strip of sticky tape along the left side of the card, added the lace in a zig zag. I added Butteflies and Pearls. At the bottom I added the Rosettes. Sorry no pictures of how I did this my battery died on my camera. Here is my finished card and I hope you like how it came out.
I finished the inside with a piece of Crumb Cake card stock I ran thru the Framed Tulip embossing folder and added a large Butterfly. I added a Thinking of You sentiment.
Please let me know what you think of my picturtorial.


totally awesome card and technique!!!!!
ReplyDeletelove your style!!!!
just have to cased it for my Consider It cased week!!!!
tfs:)
Fabulous pictorial. Such an awesome technique. TFS
ReplyDeleteReally cool technique! I just have to try this. I am in an embossing phase and this is right up my alley. Thanks for sharing your lovely card. I popped over from Nitestamper's blog.
ReplyDeleteThis is really beautiful and your tutorial is great! Thanks so much for sharing!
ReplyDeleteThis card is beautiful and I love the technique. I can't wait to try it. Can you explain why you inked up with VersaMark and then Whisper White ink before stamping? I'm not understanding that step. :0) Thanks!
ReplyDelete