Saturday, February 26, 2011

Elements of Style-Neutral Shadowing Tutorial

I had a few request to how I did my version of Neutral Shadow that I posted for the SU Tour. Well I did it using my favorite stamp set Elements of Style. It looks longer than it is to do the technique, I know this is suppose to be clean and simple, but I have a hard time not adding lace, pearls, ribbons to my cards. I just love the Vintage look.

Supplies:
Cardstock:      Crumbcake, Soft Seude
Ink pads:         Soft Seude, Versa Mark, Craft Whisper White
Markers;          Cherry Cobbler, Soft Seude, Crumb Cake
Embossing Folder Framed Tulips, Rosettes from Occasions Mini
Clear Embossing Powder
Victoria Lace and  Basics Pearls
Beautiful WIngs Embosslits Die


Let's get started: I stamped first with Versa Mark, then I restamped with Craft Whisper White

 Then stamped on crumb cake card stock.

Then gathered up my embossing tray, heat gun and clear embossing powder and embossed the image. 


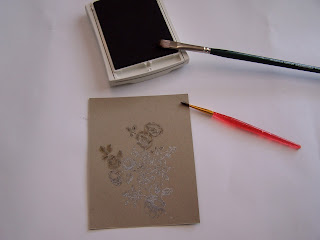
Then I took Soft Suede Ink pad and it should have been a stencil brush but I didn't have one and used
some of my paint brushes. The softer one worked better for me. What you next is tap the ink and stipple or add ink to the outline of the stamp you used(almost like stenciling). Becareful because too fast and cause the shadowing to go outside the lines and smudge.


When you are finished it should look something like this.


I then ran Soft Seude card stock thru the Framed Tulip embossing folder
 Then I gathered up what I was going to use to complete my card. You will see I already used the embosslits and made my butterflies, cut my strip of  lace.

I took 3 rosettes and clored them to match the colors in my card. Here I show how I colored one using Cherry Cobbler, and then a picture of them finished.


Then I added small basic pearls to the centers of the rosettes.

Then I ran a strip of sticky tape along the left side of the card, added the lace in a zig zag. I added Butteflies and Pearls. At the bottom I added the Rosettes. Sorry no pictures of how I did this my battery died on my camera.  Here is my finished card and I hope you like how it came out.  


I finished the inside with a piece of Crumb Cake card stock I ran thru the Framed Tulip embossing folder and added a large Butterfly. I added a Thinking of You sentiment.

Please let me know what you think of my picturtorial.

Friday, February 25, 2011

SU Stars Recipe Swap

I made this one 6 x 6 for SU Stars February Swap. This is my first Scrap booking recipe swap in a long time, but with it being February and the need for Chocolate, what else is a girl to do. I found the recipe on the Internet just before Christmas and thought what a great idea. I hope you enjoy this recipe immensely! 


Supplies:
Card stock: Rose Red, Old Olive, Not Quite Navy, Perfect Plum

Stamp Ink: Chocolate Chip, Versa Mark

DSP: Springtime Vintage out of Occasions Mini
Accessories: Rose Red Seam Binding, Basic Pearls, Old Olive brads, Chantilly Lace
Top Note big Die, Lattice embossing folder, Beautiful Wings Embosslits Die.
 
Chocolate cake in a cup

4 tablespoons flour
4 tablespoons sugar
2 tablespoons cocoa
1 egg
3 tablespoons milk
3 tablespoons oil
3 tablespoons chocolate chips (optional)
A small splash of vanilla extract, 1 large coffee mug (Micro Safe)
Add dry ingredients to mug and mix well.
Add the egg and mix thoroughly, Pour in the milk and oil and mix well.
Add the chocolate chips (if using) and vanilla extract, and mix again.
Put your mug in the microwave and cook for 3 minutes.
The cake will rise over the top of the mug, but don't be alarmed!
Allow to cool a little, and tip out onto a plate if desired. Drizzle Carmel over the cake.

Then EAT! (This can serve 2 if you want to feel slightly more virtuous.)

Saturday, February 19, 2011

Welcome to SU Stars Blog Tour 4

It's that time again for SU Stars monthly Blog Tour that is happening this weekend February 19/20. The start time is Saturday morning at 7am PT/8am MT/9am CT/10am ET and the posts will be up thur Sunday night at Midnight.

If you started at the beginning then you arrived here from the very talented Diana Soling at http://handmadebydiana.typepad.com/ and you are right on track. If you get lost along the way then go back to the beginning at http://su-stars.blogspot.com/ where you will find the list of blogs.

This month we are focusing on items from the Occasions Mini and Sale-A-Bration's Mini.  I chose to make my card from the Occasions Mini. I love everything in the mini so it was hard to choose just one, so I didn't.

 I wanted to create something simple and elegant and I hope you like how it came out.

I am a new demonstrator so I am learning new things all the time and this week I tried a technique called Neutral Shadows from technique junkie.  I used the new Framed Tulips embossing folder to add depth and texture.  I stamped the image with Versa Mark, craft whisper white and then sprinkled clear embossing powder over the image and  then I heat embossed . Then I took a brush (or stencil brush) and stippled the neutral ink(basic grey) on and around the embossed image, following the lines of the design.   I took some of Su basic pearls and dyed them to match using a sponge dauber with basic grey ink for a little Bling! Added some Satin Grey ribbon(retired).

Here is what you will need:

Card Stock:  Basic Grey, Whisper White
Ink Pads:      Basic Grey, Versa Mark
Stamp sets:  Because I care and Afterthoughts(from the SAB)
Clear embossing powder, adhesive, glue dots, Basic Pearls, ribbon
Framed Tulip embossing folder from the new Occasion's Mini

Leave me a comment if you like, I enjoy reading what everyone says.  Now onto Marta Gomez, at http://www.stampartpapel.com/.  I know Marta  has something wonderful planned for you.

Thursday, February 10, 2011

Look What I Found: Another Chocolate Recipe!


I wish I could say this was my recipe but I found the recipe on Judy’s blog at: http://judyscraftroom.blogspot.com. I love trying new recipes and this one rocks. Thanks Judy for sharing this one. I plan on surprizing my family this Valentine's Day with this Yummy!!!!

This recipe makes about 4 dozen of the most luscious dessert I have tried in a long time.

Easy Oreo Truffles

1- Large bag of chocolate Oreo cookies
1- 8 oz package of Cream Cheese
Chocolate wafers (Milk and white chocolate)

Crush the cookies in your food processor until they are fine crumbs. (Reserving a couple of tablespoons for the topping)

Add block of cream cheese, to cookie crumbs and pulse until it's well blended. At this point I usually put it into the fridge for 30 minutes or so...just so it's chilled.

Roll the mixture into 1" balls and place on parchment lined cookie sheet, place back in fridge until chilled again.

Melt chocolate wafers in a microwave bowl, drop truffle into chocolate and make sure it's well covered. Remove the truffle from chocolate with 2 forks and place on wax paper....and sprinkle with chocolate crumbs or pink salt. Then keep in the fridge until you are ready to serve...that's it....sooo yummy!

To make the salt, I used coarse salt...like the kind I use for homemade pretzels. Put some salt in a baggie and add a few drops of red food coloring. Sprinkle on chocolate covered truffles!

You can also melt chocolate in a baggie and pierce on end of the baggie with a toothpick and drizzle white chocolate on dark truffles or dark chocolate on white truffles.

I bet you can't eat just one!! Enjoy!!

Wednesday, February 2, 2011

Badge Contest-Queen Kat Designs

the Princess of Darkness from the Creepie Cuties line is running a lil contest for you all to win a new release stamp this Wednesday.  For more information go to http://www.katstamps.com/.
Related Posts Plugin for WordPress, Blogger...