I saw this flower on YOU Tube one day and just had to learn how to do it. Today was that day, I was surprised how easy it really is to do. I used the new Stampin Up Scallop Punch to make this great big Orange flower, added a retired SU Brown brad for the center. SU ribbon, Butterflies Sizzlits, and Polka Dots Embossing folder. I will be making more of these flowers, they are just so cute.
......................................................................................................Independent Stampin Up Demonstrator...................... Jackielwatson2009@hotmail.com ***** 702 945-8073 *****
Wednesday, July 21, 2010
Dawn's Craft Place: Candy Blog Alert!!!!!!!!!!!!!!!!!!!!!!!!
This Candy is to celebrate at http://www.kelliewinnell.com/ you have until Aug. 16th to add your name and join in on all the fun. Good Luck everyone.
Friday, July 16, 2010
WELCOME TO VC ROCKS BLOG HOP III
This month we are featuring Stampin Up items from the new 2010-2011 catalog. I know you will be as excited as I am over all the new colors, stamp sets, and much more. If you arrived here from the very
creative Angela's Walter's blog at: http://www.lifewithawienerdog.blogspot.com/, then you are in the right place. If not, you can start at the beginning at http://www.vcrocks.blogspot.com/.
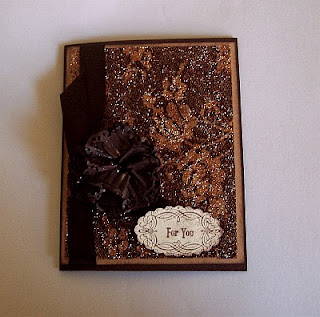
The card I have chosen to make is called Glitzy Lace from Technique Junkie. I love mixing different textures and of coarse adding a little Bling is always a good thing. I love doing this technique, it is quick, easy and gives such beautiful results. I love making Vintage Cards and I hope you like the one I created for you.
Supplies:
Chocolate Chip, Cream Carmel card stock
Lace with a clear design from my stash box
Stamp set: Vintage Tags
Punch: Oval Scallop, eyelet punch
Chocolate Chip Satin Ribbon
SU sticky paper
Stick on pearls (Copper)
Tidy Tray
2 shades of glitter( I used chocolate, and copper)
Recipe:
1. First I cut my card stock to finished piece size. Then I apply the double-sided tape to the card stock. Remove protective backing from the adhesive side.
2. Place the lace over the adhesive-covered card stock, making sure the lace is pulled taut.
3. Working over a tidy tray sprinkle the first glitter color onto the card stock. Gently press glitter into the adhesive. Tap off excess glitter.
4. Remove the lace carefully, using caution not to disturb the glitter.
5. Sprinkle second glitter over the newly exposed adhesive. Note the two colors should not mix.
6. Tap off excess and press glitter into the card stock. Use as desired.
7. Then I cut a 1 inch strip of Chocolate Chip and use the eyelet punch on one side. This is to make the flower. (I got the idea to make the flower from Kim Schach flower tutorial). They are gorgeous.
Now for the fun part, attach the ribbon and flower to the faux lace card stock, glue lace card to the second layer and add sentiment and then attached to base card. That is all there is to it.
I hope you are enjoying hopping from blog to blog today. Now it is time for me to get you over to Melanie's blog at: http://www.melanieschulenberg.blogspot.com/. I just know she has something special for you. Please don't hesitate to leave a comment , I enjoy reading each of them.
Monday, July 12, 2010
Blog Candy
Happy Birthday Jodie, she is offering awesome Blog Candy and 5 chances to win. Her Blog is http://inkedinspirations.blogspot.com/ I have Blog Candy 2 but there are many more pictures. Go take a look.
Subscribe to:
Comments (Atom)


